While many users find the Click-to-Run feature helpful as they can edit documents, presentations, Excel sheets right away while the download and installation process continues in the background, some have complaints and concerns as the service is always running in the background and slowing down the PC.
Office Click-to-Run service can be easily disabled on a Windows computer, but the process is not clear for beginners, which is why in this article, we have created a step-by-step guide to fully disable the Click-to-Run feature in Microsoft Office.
Note: After Disabling the office click to run service, Your MS Office version will no longer be updated automatically to the latest features and security patches. You have to manually check for updates through Microsoft Update.
Steps
To disable Click-to-Run is a service in Microsoft Office there are two main methods :
Method 1: Via Control Panel
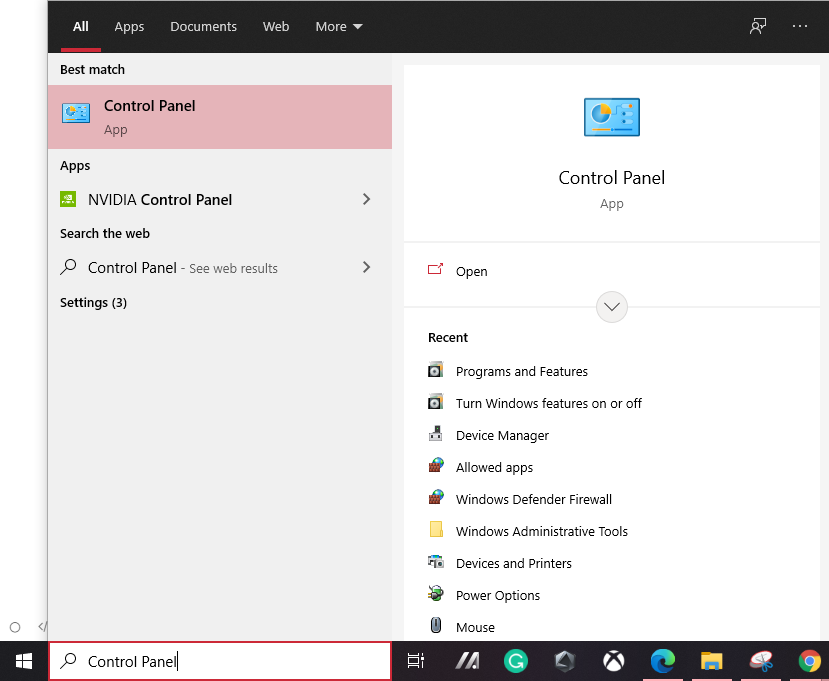
Step 1: Click the Start menu and search for Control Panel.

Step 2: Open Control Panel and look for Administrative Tools. If you cannot find administrative tools click on view by large icons (see the screenshot below)

Step 3: Once you sort the control panel by large icons, Administrative Tools will be the first option in settings,

Step 4: Open Administrative Tools, and you will find many items listed. Click on Services from the list

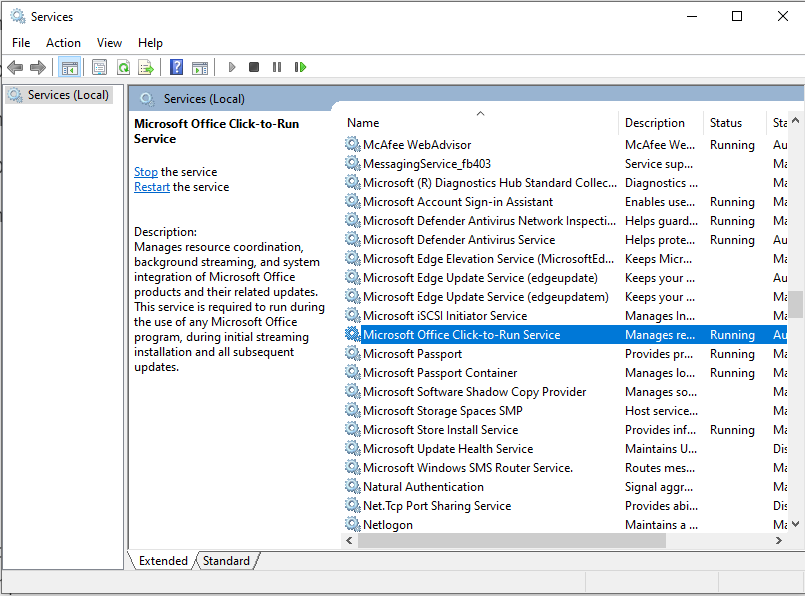
Step 5: Open Services and find Microsoft Office Click-to-Run service in services Window

Step 6: Right-click on the service select Properties

Step 7: In the General tab, find Startup Type, Pull down the Startup Type menu and select Disabled. Click OK and Apply.

Step 8: You might have to restart your computer for changes to reflect. After restarting, the Click-to-Run service won’t start
on startup and will not slow down or interfere with your other computer applications.
To revert back the changes. Just follow the above steps again and then choose startup type to be Automatic instead of Disabled in Step 7.
Note: The above steps are for Windows 10 but should work with Windows 7 and 8.
Method 2: Via Run Command
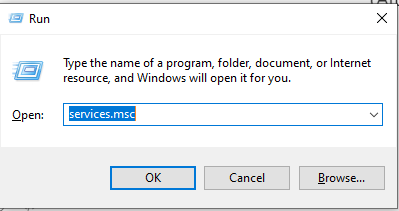
Step 1: Press the Windows + R keyboard hotkey, and you will see the run application launched.

Step 2: Type services.msc without quotes in the run command search menu and press OK.

Step 3: The services menu will open, find Microsoft Office Click-to-Run service in services Window

Step 6: Right-click on the service select Properties

Step 7: In the General tab, find Startup Type, Pull down the Startup Type menu and select Disabled. Click OK and Apply.

Step 8: You might have to restart your computer for changes to reflect. After restarting, the Click-to-Run service won’t start on startup and will not interfere with your other computer applications.
To revert back the changes. Just follow the above steps again and then choose startup type to be Automatic instead of Disabled in Step 7.
Note: The above steps are for Windows 10 but should work with Windows 7 and 8.


